HAProxyでロードバランシング

サーバの負荷分散ができるHAProxyを使ってみました。


サーバ構成

役割
IP
備考
webサーバ 192.168.1.121 index.htmlを配置
webサーバ 192.168.1.122 index.htmlを配置
HAProxy 192.168.1.123  
webサーバ 192.168.1.124 index.txt


構築

HAProxy(192.168.1.123)

インストール

$ sudo yum -y install haproxy

設定ファイル

$ cat /etc/haproxy/haproxy.cfg
global
log 127.0.0.1 local2

chroot /var/lib/haproxy
pidfile /var/run/haproxy.pid
maxconn 4000
user haproxy
group haproxy
daemon

# turn on stats unix socket
stats socket /var/lib/haproxy/stats

defaults
mode http
log global
option httplog
option dontlognull
option http-server-close
option forwardfor except 127.0.0.0/8
option redispatch
retries 3
timeout http-request 10s
timeout queue 1m
timeout connect 10s
timeout client 1m
timeout server 1m
timeout http-keep-alive 10s
timeout check 10s
maxconn 3000

frontend main *:80
acl url_static path_beg -i /static /images /javascript /stylesheets
acl url_static path_end -i .jpg .gif .png .css .js .html

use_backend static if url_static
default_backend app

backend static
balance roundrobin
server static 192.168.1.121:80 check
server static 192.168.1.122:80 check

backend app
balance roundrobin
server app1 192.168.1.124:80 check

.htmlファイルは192.168.1.121と192.168.1.122に、

そのほかのファイルは192.168.1.124に接続されるよう設定しました。

起動

$ sudo /etc/init.d/haproxy start


webサーバ(192.168.1.121、192.168.1.122、192.168.1.124

インストール

$ sudo yum install httpd

設定ファイル

192.168.1.121サーバ

$ cat /var/www/html/index.html
<html>
hoge1
</html>

192.168.1.122サーバ

$ cat /var/www/html/index.html
<html>
hoge2
</html>

192.168.1.123サーバ

$ cat /var/www/html/index.txt

hoge4.txt

起動

sudo /etc/init.d/httpd start

実行

index.htmlにアクセスする。

$ curl 192.168.1.123/index.html
<html>
hoge1
</html>
$ curl 192.168.1.123/index.html
<html>
hoge2
</html>
$ curl 192.168.1.123/index.html
<html>
hoge1
</html>
$ curl 192.168.1.123/index.html
<html>
hoge2
</html>

192.168.1.121と192.168.1.122交互にアクセスしています 


index.txtにアクセスする。

$ curl 192.168.1.123/index.txt
hoge4.txt

$ curl 192.168.1.123/index.txt
hoge4.txt

192.168.1.124のみアクセスしています 


無事負荷分散できました!

参考URL

オデの日記@WEB系: L7ロードバランサHaproxyを使う(その2 設定から起動)

CentOS 6.5 で HAProxy を試してみる | CUBE SUGAR STORAGE

HAProxy Documentation Converter

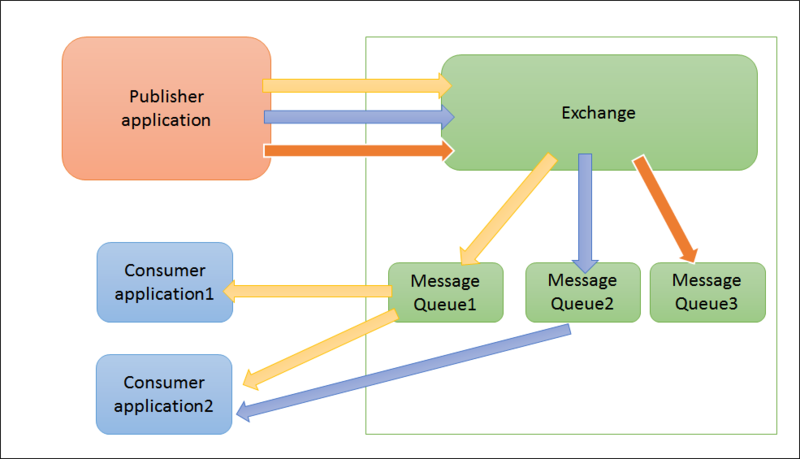
RabbitMQでメッセージキューイングシステムを実現する

RabbitMQとはAMQP対応のメッセージキューイングシステムです。

何ができるかというと、遅い処理をキューに貯めてあとで処理することで高速なレスポンスを返すとができます。
f:id:katashiyo515:20140921133042p:plain

f:id:katashiyo515:20140921133045p:plain


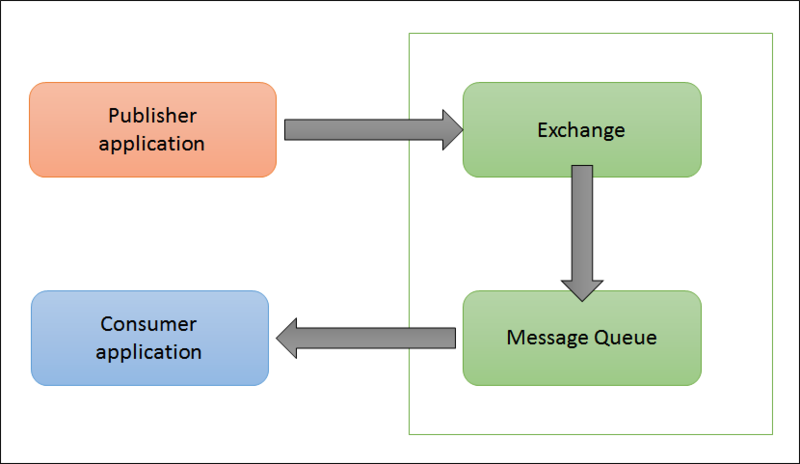
もう少しわかりやすく表すとこんな感じです。

メッセージキューシステムを使わない場合

f:id:katashiyo515:20140921133047p:plain

メッセージキューシステムを使う場合

f:id:katashiyo515:20140921133049p:plain


では、さっそく使ってみます

RabbitMQのインストール

今回はrubybunnyでRabbitMQを使ってみました。

bunnyのインストール
$ curl -sSL https://get.rvm.io | bash -s stable
export PATH=$PATH:/usr/local/rvm/bin/
$ rvm install ruby-2.1.1
$ rvm use ruby-2.1.1
$ gem install bunny --version ">= 0.9.1"
erlangのインストール
sudo yum install erlang
RabbitMQのインストール
$ curl -O http://www.rabbitmq.com/releases/rabbitmq-server/v3.3.5/rabbitmq-server-3.3.5-1.noarch.rpm
sudo rpm -ivh --nosignature  rabbitmq-server-3.3.5-1.noarch.rpm
Management Plugin(RabbitMQ)のインストール
sudo /usr/lib/rabbitmq/bin/rabbitmq-plugins enable rabbitmq_management

※必須ではないですが、管理が便利なので入れています

https://www.rabbitmq.com/management.html

RabbitMQの起動

sudo /sbin/service rabbitmq-server start
Starting rabbitmq-server: SUCCESS
rabbitmq-server.

ユーザの追加と削除

# hogeユーザをhogeパスワードで追加
sudo rabbitmqctl add_user hoge hoge
sudo rabbitmqctl set_permissions hoge ".*" ".*" ".*"
sudo rabbitmqctl set_user_tags hoge administrator
 
 
# guest削除
sudo rabbitmqctl delete_user guest

クラスタ

4台でクラスタ化しました。

https://www.rabbitmq.com/clustering.html

host名
ip
role
myserver
192.168.1.210 Consumer
myserver2
192.168.1.212 Consumer
myserver3
192.168.1.213 Publisher
myserver4
192.168.1.214 Publisher

myserver2、myserver3、myserver4で以下を実行しクラスタ

# RabbitMQサーバを停止
sudo /sbin/service rabbitmq-server stop
# cookieの中身を同じにする
$ vim /var/lib/rabbitmq/.erlang.cookie
# myserver
sudo /sbin/service rabbitmq-server start
sudo rabbitmqctl stop_app
Stopping node rabbit@myserver3 ...
...done.
sudo rabbitmqctl join_cluster --ram rabbit@myserver
Clustering node rabbit@myserver3 with rabbit@myserver ...
...done.
sudo rabbitmqctl start_app
Starting node rabbit@myserver3 ...
...done.

管理画面で見るとこんな感じになります

f:id:katashiyo515:20140921133052j:plain


実行

Publisher側のコード

send.rb
#!/usr/bin/env ruby
# encoding: utf-8
require "bunny"
conn = Bunny.new(:hostname => "localhost":username => "hoge":password => "hoge")
conn.start
ch = conn.create_channel
q = ch.queue("hello")
msg = ARGV.empty? ? "Hello World!" ARGV.join(" ")
ch.default_exchange.publish(msg, :routing_key => q.name)
puts " [x]Sent " + msg
conn.close

 Consumerのコード

send.rb
#!/usr/bin/env ruby
# encoding: utf-8
require "bunny"
conn = Bunny.new(:username => "hoge":password => "hoge")
conn.start
ch = conn.create_channel
q  = ch.queue("hello")
puts "[*] Waiting fo messages in #{q.name}. To exit press CTR+C"
q.subscribe(:block => truedo |delivery_info, properties, body|
    puts " [x]Received #{body}"
end

実行する

Consumer1

send.rb
$ ruby receive.rb

Consumer2

send.rb
$ ruby receive.rb

Publisher1側

1秒おきにメッセージを送る

send.rb
for in `seq 1 100`; do sleep 1;ruby -rubygems send.rb pub1_$i; done

Publisher2側

2秒おきにメッセージを送る

send.rb
for in `seq 1 100`; do sleep 2;ruby -rubygems send.rb pub2_$i; done
実行結果

Publisher1、Publisher2から送られたメッセージがConsumer1、Consumer2で処理されています。
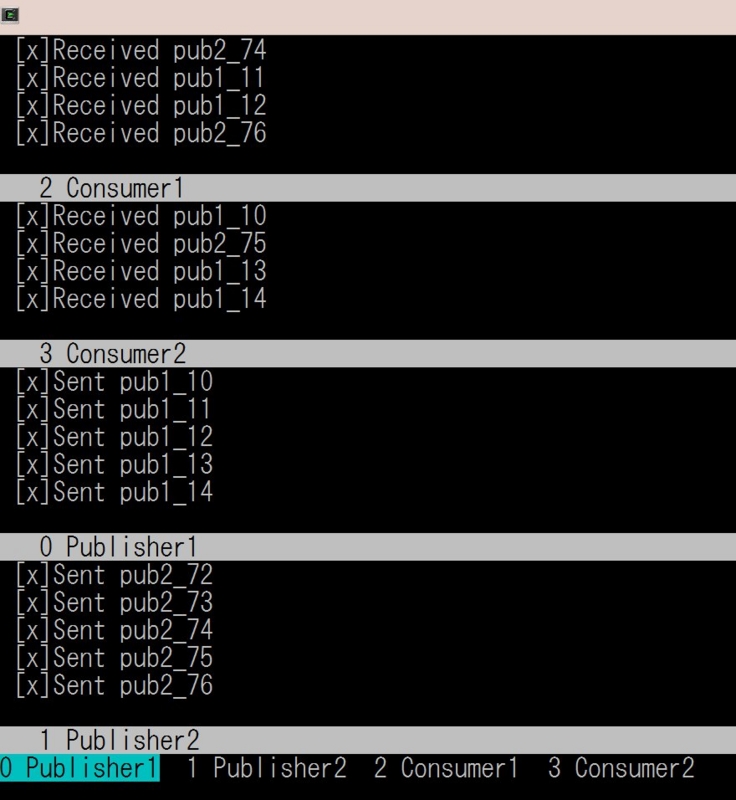
f:id:katashiyo515:20140921133054j:plain

試したところこんな動きをしていました。

Consumer1
Consumer2
結果
停止 停止 処理されずキューがたまる。Consumer起動時にたまったキューを処理
停止 稼働 Consumer2で処理
稼働 停止 Consumer1で処理
稼働 稼働 Consumer1、Consumer2で交互に処理(Round-Robin?)


おしまい。

参考

http://www.rabbitmq.com/


logstashで不正アクセスのログを集める

grepでログを確認するのが面倒だ!!


そんなときに便利なログ収集ツールlogstashを使ってみました。

fluentdを使う方法もあるそうですが、今回はlogstash+elasticsearch+kibanaで構築します。

f:id:katashiyo515:20140920092736j:plain

サーバ機能名用途
192.168.1.210 logstash elasticsearchにログを送る
192.168.1.212 elasticsearch logstashから送られたログをdbに保存
kibana elasticsearchからログを取得し画面に表示する


elasticsearchのインストール(192.168.1.212)

javaのインストール

sudo yum install java-1.7.0-openjdk

elasticsearchのダウンロード
$ curl -O https://download.elasticsearch.org/elasticsearch/elasticsearch/elasticsearch-1.1.1.tar.gz
$ tar zxvf elasticsearch-1.1.1.tar.gz
$ cd elasticsearch-1.1.1/
elasticsearchの実行

$ ./bin/elasticsearch

kibanaのインストール(192.168.1.212)

アパッチのインストール

$ sudo yum install httpd

kibanaのインストール

$ cd /var/www/html/
$ sudo curl -O https://download.elasticsearch.org/kibana/kibana/kibana-3.1.0.tar.gz
$ sudo tar zxvf kibana-3.1.0.tar.gz

アパッチのリスタート

$ sudo /etc/init.d/httpd restart

kibanaにアクセス

http://192.168.1.212/kibana-3.1.0/

フィルターを作成

termsパネルを追加

f:id:katashiyo515:20140920093633j:plain

logstashのインストール(192.168.1.210)

javaのインストール

$ sudo yum install java-1.7.0-openjdk

logstashのダウンロード

$ wget https://download.elasticsearch.org/logstash/logstash/logstash-1.4.2.tar.gz --no-check-certificate
$ tar zxvf logstash-1.4.2.tar.gz
$ cd logstash-1.4.2

logstashの設定ファイルの作成

この形式のログを分解しelasticsearchに送ることにします

Sep 18 01:01:01localhosti sshd[1234]: Invalid user oracle from 123.456.789.012

vim mylogstash.conf 

input {
file {
type => "seucure-log"
path => "/var/log/secure"
}
}
filter {
grok {
add_tag => ["testtag"]
match => {
"message" => "%{SYSLOGTIMESTAMP:syslogtimestamp} %{DATA:data}: Invalid user %{NOTSPACE:invaliduser} from %{HOSTNAME:invalidhostname}"
}
}
if "_grokparsefailure" in [tags] { drop {} }
}

output {
elasticsearch {
host => "192.168.1.212"
protocol => http
}
stdout { codec => rubydebug }
}

この辺りを参考にfilterを作る

logstashを起動
$ sudo bin/logstash -f mylogstash.conf -l log.txt

実験

192.168.1.210に不正アクセスをする

ssh hogeq@192.168.1.210

ssh hogeq@192.168.1.210

ssh hog2@192.168.1.210

ssh hog2@192.168.1.210

ssh test@192.168.1.210

kibnaにアクセスして確認

不正アクセスしたユーザをグラフ化できました。

f:id:katashiyo515:20140920092951j:plain


実際はoracleとかnagiosとかで接続しに来ることが多いようです

f:id:katashiyo515:20140920093436j:plain

おしまい。

参考

logstash - open source log management

Vagrantコマンド

久しぶりにvagrantを使ったらコマンドを忘れていたのでまとめたメモです。


Vagrantfileのサンプル

VAGRANTFILE_API_VERSION = "2"
Vagrant.configure(VAGRANTFILE_API_VERSION) do |config|
  config.vm.define :centos1 do |dev|
    dev.vm.box               = "chef/centos-6.5"
    dev.vm.provision "shell" do |s|
      s.inline = "sudo yum install screen -y;"
    end
  end
end

Vagrantfileを作る

$ vagrant init

boxの追加

$ vagrant box add chef/centos-6.5

Discover ready-made boxes から利用できるboxを確認できます

box確認

$ vagrant box list

状態の確認

$ vagrant status

起動

$ vagrant up centos1

ログイン

$ vagrant ssh centos1

終了

$ vagrant destroy centos1

中断

$ vagrant suspend

再開

$ vagrant resume

provisionだけ実行

$ vagrant reload centos1 --provision

boxの追加

vagrant package --base CentOS64
vagrant box add  kashi/centos package.box
※実行前にVirtualBox上でCentOS64という名前の仮想環境を作る必要があります。

boxの削除

vagrant box remove hashicorp/precise32 virtualbox
リンク

VAGRANT DOCUMENTATION

chefでユーザ作成

chefを使ってユーザを作成する方法

chef solo, knife solo, chef serverで実行できます。

レシピ

# パスワードをhoge

$ openssl passwd -1 "hoge"

$1$EVTsgD0f$QpzIEDmbxqVN73laspifv.


# hogeユーザの作成 

$ vim recipes/default.rb

user "hoge" do

    comment "hoge User"

    uid 1234

    gid "users"

    home "/home/hoge"

    shell "/bin/bash"

    password "$1$EVTsgD0f$QpzIEDmbxqVN73laspifv."

    action:create

end


あとはレシピを実行すればhogeユーザが作成されます。

仕様を見る限りユーザの削除もできます。

参考資料

user — Chef Docs


KnifeSoloを使ってサーバー構築

ChefServerChefSoloに続いて、KnifeSoloを使ってみました。

サーバーの準備

例によって、Vagrantで環境を作ります。

Vagrantfile作成

$ vim Vagrantfile
VAGRANTFILE_API_VERSION = "2"
Vagrant.configure(VAGRANTFILE_API_VERSION) do |config|
  config.vm.define :centos2 do |dev|
    dev.vm.box               = "chef/centos-6.5"
    dev.vm.hostname          = "192.168.1.111"
    dev.vm.network :public_network, ip: "192.168.1.111"
  end
  config.vm.define :centos3 do |dev|
    dev.vm.box               = "chef/centos-6.5"
    dev.vm.hostname          = "192.168.1.110"
    dev.vm.network :public_network, ip: "192.168.1.110"
  end
end

構築

$ vagrant up centos2 centos3

ログイン

$ vagrant ssh centos2

KinfeSoloのインストール

rubyのインストール

$ curl -sSL https://get.rvm.io | bash -s stable
$ source .profile
$ sudo yum install libyaml-devel
$ rvm install ruby-2.1.1
$ source .rvm/scripts/rvm
$ rvm use ruby-2.1.1
$ ruby -v
ruby 2.1.1p76 (2014-02-24 revision 45161) [x86_64-linux]
$ gem -v
2.2.2

KnifeSoloをインストー/ル

$ gem install knife-solo

レポジトリの作成

$ knife solo init chef-repo
$ cd chef-repo
$ knife cookbook create sample -o cookbooks

クライアントにchef-soloをインストール

$ knife solo prepare vagrant@192.168.1.110 --omnibus-options insecure

※ エラーになったのでrsync入れました。
sudo yum install rsync

レシピの作成

$ vi cookbooks/sample/recipes/default.rb
package "httpd" do
 action :install
end
service "httpd" do
 action [ :enable, :start ]
end
cookbook_file "/var/www/html/index.html" do
 source "index.html"
 mode "0644"
end
 
$ vi cookbooks/sample/files/default/index.html
<html>
<body>
 <h1>Hello, world!</h1>
</body>
</html>
 
# nodes/ホスト名.json
$ vi nodes/192.168.1.110.json
{"run_list":["recipe[sample]"]}

クライアントにレシピをインストール

[vagrant@192 chef-repo]$ knife solo cook vagrant@192.168.1.110
Running Chef on 192.168.1.110...
Checking Chef version...
Enter the password for vagrant@192.168.1.110:
Uploading the kitchen...
vagrant@192.168.1.110's password:
Generating solo config...
vagrant@192.168.1.110's password:
Running Chef...
[2014-05-17T00:53:49+00:00] WARN:
* * * * * * * * * * * * * * * * * * * * * * * * * * * * * * * * * * * * * * * *
SSL validation of HTTPS requests is disabled. HTTPS connections are still
encrypted, but chef is not able to detect forged replies or man in the middle
attacks.
To fix this issue add an entry like this to your configuration file:
```
  # Verify all HTTPS connections (recommended)
  ssl_verify_mode :verify_peer
  # OR, Verify only connections to chef-server
  verify_api_cert true
  verify_api_cert true
```
To check your SSL configuration, or troubleshoot errors, you can use the
`knife ssl check` command like so:
```
  knife ssl check -c /home/vagrant/chef-solo/solo.rb
```
* * * * * * * * * * * * * * * * * * * * * * * * * * * * * * * * * * * * * * * *
Starting Chef Client, version 11.12.4
Compiling Cookbooks...
Converging 3 resources
Recipe: sample::default
  package[httpd] action install
    - install version 2.2.15-30.el6.centos of package httpd
  * service[httpd] action enable
    - enable service service[httpd]
  * service[httpd] action start
    - start service service[httpd]
  * cookbook_file[/var/www/html/index.html] action create
    - create new file /var/www/html/index.html
    - update content in file /var/www/html/index.html from none to 69c55a
        --- /var/www/html/index.html    2014-05-17 00:54:00.052014612 +0000
        +++ /tmp/.index.html20140517-7453-saxrdh        2014-05-17 00:54:00.079014612 +0000
        @@ -1 +1,6 @@
        +<html>
        +<body>
        + <h1>Hello, world!</h1>
        +</body>
        +</html>
    - change mode from '' to '0644'
    - restore selinux security context
 
Running handlers:
Running handlers complete
Chef Client finished, 4/4 resources updated in 10.961148419 seconds

パスワードきかれすぎ。。、nopass以外でいい方法が知りたいです。。 

ブラウザから確認

http://192.168.1.110


f:id:katashiyo515:20140517103909j:plain

参考URL

http://matschaffer.github.io/knife-solo/


トラブルシューティング

■エラー1
[vagrant@192 chef-repo]$ knife solo cook vagrant@192.168.1.110
Running Chef on 192.168.1.110...
Checking Chef version...
Enter the password for vagrant@192.168.1.110:
Uploading the kitchen...
ERROR: RuntimeError: Failed to launch command ["rsync""-rL""--rsh=ssh vagrant@192.168.1.110""--delete""--exclude=revision-deploys""--exclude=tmp""--exclude=.git""--exclude=.hg""--exclude=.svn""--exclude=.bzr""/home/vagrant/.rvm/gems/ruby-2.1.1/gems/knife-solo-0.4.1/lib/knife-solo/resources/patch_cookbooks/"":~/chef-solo/cookbooks-1"]
 
→ rsyncコマンドがなかったのでいれる
→ $ sudo yum install rsync
 
 
■エラー2
$ knife solo prepare vagrant@192.168.1.110
trying wget...
ERROR 404
Unable to retrieve a valid package!
→とりあえず最新版にしてみる
→$ knife solo prepare vagrant@192.168.1.110 --omnibus-options insecure
→なぜかうまくいった

ChefSoloの使い方

ChefServerは3台必要でしたが、ChefSoloは1台でChefを実行できます。

今回はChefSoloを使ってWebサーバを構築します。 

サーバの準備

vagrantを使っています。

Vagrant file

$ vim Vagrantfile
VAGRANTFILE_API_VERSION = "2"
Vagrant.configure(VAGRANTFILE_API_VERSION) do |config|
  config.vm.define :centos2 do |dev|
    dev.vm.box               = "chef/centos-6.5"
    dev.vm.hostname          = "dev102"
    dev.vm.network :private_network, ip: "10.0.0.102"
  end
end

構築

$ vagrant up centos2

ログイン

$ vagrant ssh centos2


ChefSoloをインストール

$ wget https://www.opscode.com/chef/install.sh
$ sudo bash install.sh -v 11.4.0


レシピの作成

knifeの初期化

$ knife configure
WARNING: No knife configuration file found
Where should I put the config file? [/home/vagrant/.chef/knife.rb]
Please enter the chef server URL: http://dev102:4000
Please enter an existing username or clientname for the API: [vagrant]
Please enter the validation clientname: [chef-validator]
Please enter the location of the validation key: [/etc/chef/validation.pem]
Please enter the path to a chef repository (or leave blank):

レシピの作成

# gitのインストール
$ sudo yum install git $ git clone git://github.com/opscode/chef-repo.git
$ cd chef-repo/
# cookbookの作成(sampleという名前で作っています)
$ knife cookbook create sample -o cookbook ** Creating cookbook sample ** Creating README for cookbook: sample ** Creating CHANGELOG for cookbook: sample ** Creating metadata for cookbook: sample

$ vi cookbook/sample/recipes/default.rb package "httpd" do action :install end service "httpd" do action [ :enable, :start ] end cookbook_file "/var/www/html/index.html" do source "index.html" mode "0644" end $ vi cookbook/sample/files/default/index.html <html> <body> <h1>Hello, world!</h1> </body> </html>

$ vi localhost.json
{
 "run_list":[
 "recipe[sample]"
 ]
}

$ vi solo.rb
file_cashe_path "/tmp/chef-solo"
cookbook_path ["/home/vagrant/chef-repo/cookbook"]


ChefSoloを実行

$ sudo chef-solo -c solo.rb -j localhost.json
Starting Chef Client, version 11.4.0
Compiling Cookbooks...
Converging 3 resources
Recipe: sample::default
  * package[httpd] action install
    - install version 2.2.15-30.el6.centos of package httpd
  * service[httpd] action enable
    - enable service service[httpd]
  * service[httpd] action start
    - start service service[httpd]
  * cookbook_file[/var/www/html/index.html] action create
    - create a new cookbook_file /var/www/html/index.html
        --- /tmp/chef-tempfile20140515-7393-tcwf1m      2014-05-15 15:54:20.639403562 +0000
        +++ /home/vagrant/chef-repo/cookbook/sample/files/default/index.html    2014-05-15 15:47:15.061722443 +0000
        @@ -0,0 +1,6 @@
        +<html>
        +<body>
        +  <h1>Hello, world!</h1>
        +</body>
        +</html>
        +
Chef Client finished, 4 resources updated


確認

ブラウザから確認


http://10.0.0.102/

f:id:katashiyo515:20140516080010j:plain

 おしまい。